
From Data to Intelligence: Unlocking the Power of AI Agents in Snowflake
20.11.2025How Snowflake Intelligence transforms data workflows with conversational AI agents.
Data has always been valuable — but let’s be honest, unlocking that value has not always been easy. Between complex queries, endless dashboards, and tool overload, getting insights from data often feels harder than it should be.
That’s why Snowflake Intelligence is gaining so much traction. It simplifies how to interact with data and makes it easier to generate insights. It goes even further — it can fetch data from the internet and incorporate it to provide the most up-to-date results. All this is done through a minimalistic GUI that reduces technical overhead and makes sharing effortless.
From Data Storage to Data Intelligence
For years, Snowflake has been the go-to platform to manage and scale data. But the process of turning that data into insights usually required exporting it to other tools for analysis or model training.
With Snowflake Intelligence, that barrier is starting to disappear. The intelligence layer brings AI and machine learning directly into the Snowflake environment — allowing teams to query, explore, and even build models within the platform.
In simple terms, this has the following implications:
- To interact with data through conversation (both by typing and voice)
- To generate text responses, guides, visualizations, and reports.
- To assist in writing and optimizing queries.
- To provide transparency by showing reasoning and displaying generated queries.
- To ensure security by following RBAC while keeping data within Snowflake.
A Practical Example
As the Snowflake User Group Leader in Riyadh, I wanted to create a few tables to track users who register, attend events, and provide feedback. I like to see how trends evolve based on feedback and, at the same time, identify which topics my users are most interested in — to help grow the community.
This often means dealing with answers to open-ended questions, which are typically hard to automate (at least for me). However, it turns out this is effortless for Snowflake Intelligence.
Furthermore, the main documentation for Snowflake Intelligence shows how to integrate Snowflake Documentation itself. This gave me an idea: since Riyadh and Saudi Arabia must comply with Data Residency laws, some features are released later when they reach GA status. Manually checking this on a regular basis is tedious — so I decided to integrate both things and use AI agents to automate these checks for me.
Using Agents in Snowflake Intelligence
Snowflake Intelligence utilizes Agents, which can connect to multiple sources as needed. Each agent is created for a specific task or domain.
Now, enough theory — let’s jump into the practical part. The diagram below illustrates how I connected all the components.
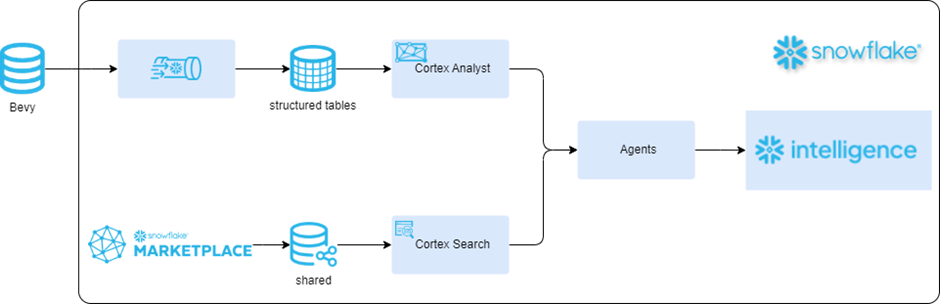
For my own data, I fetch it from Bevy, which is used by the Snowflake Community to generate and track all user group–related events. There are numerous guides explaining how to automate the data engineering part of loading data into Snowflake, so let’s focus on how to utilize that data with Snowflake Intelligence.
On the other hand, Snowflake Documentation can be integrated through the Marketplace.
To do so:
- Navigate to Snowflake Marketplace.
- Search for documentation
- Click on Snowflake Documentation.
- Click Get.
- In the installation prompt, note the database name where the Cortex Knowledge Extension is installed. You will use this later when creating the agent.
Adding Semantics in Cortex Analyst
In Cortex Analyst, I added semantics to my tables by doing the following:
- Navigate to ML & AI.
- Select Cortex Analyst.
- Create new semantics by clicking Create New, then select Create New Semantic View — this opens a guided wizard.
- Select the schema where you want to store semantics and name it.
- On the next page, select all relevant tables.
- On the final page, select all business columns as suggested by the wizard.
- Click Create and Save.
- Define table and column attributes in the GUI (the interface is intuitive and well documented).
- The more context you provide, the better the responses.
After saving, use the Playground to test functionality.
Creating the Agent
To create an agent:
- Ensure that you are using a role with the CREATE AGENT privilege
- Navigate to AI & ML.
- Select Agents.
- Click Create Agent in the top-right corner.
- Fill in Agent Object Name and Display Name, and make sure the Create this agent for Snowflake Intelligence option is checked.
- You will then see the agent editing page, which includes four tabs:
- About — Define the description and example questions to simplify interactions for end users, especially when building for larger teams.
- Tools — Connect tools like Cortex Analyst, Cortex Search Services, or custom tools. In my case, I added Cortex Analyst (using the semantics created earlier) and Cortex Search Services.
- Orchestration — Select the model, define orchestration and response instructions, and optionally limit execution time or token usage.
- Access — Assign roles that can access the agent.
If you want to generate multiple agents — for different roles you can do so now. Once everything is ready, connect it all inside Snowflake Intelligence and start interacting with your data naturally.

Conclusion
Now, try to build one yourself and experience the future of data interaction firsthand.
Snowflake Intelligence shows that data platforms can be powerful and user-friendly — turning complex processes into simple, conversational experiences.

Senior Consultant
