
Get started with Snowflake Connector for MySQL
4.02.2025
Introduction
The Snowflake Connector for MySQL consists of a Snowflake Native App, installed from the Snowflake marketplace, and an Agent application running either on-premises or in the cloud.
The connector facilitates data transfer from a MySQL source to Snowflake in three key steps:
- Schema Introspection: The source table’s DDL is analysed and recreated in Snowflake.
- Initial Load: All data from the source table is replicated to Snowflake.
- Incremental Load: Ongoing changes are synced. You can configure the load schedule, which defaults to continuous updates. Incremental updates use the Change Data Capture (CDC) technique that captures changes performed on the source database.
In this article, I will primarily focus on the prerequisites, setting up the connector, and configuring the agent container. For more detailed information about the connector itself, you can refer to the documentation available here.
Set up your MySQL environment
- Ensure that you have a MySQL 8.
- Set the following options for your MySQL:
log_bin = on
binlog_format = row
binlog_row_metadata = full
binlog_row_image = full
binlog_row_value_options =- Replication Slave and Replication Client to be able to read from binlog.
GRANT REPLICATION SLAVE ON *.* TO '<username>'@'%'
GRANT REPLICATION CLIENT ON *.* TO '<username>'@'%'
Set up the prerequisites for running the agent
- If you are using a firewall, add the Snowflake hostnames and port numbers to the allowed list.
- As agent is distributed as Docker image make sure that you have orchestration tools installed such as Docker, Kubernetes, or OpenShift (I will be using Docker).
- 6 GB of RAM and 4 CPUs available.
Set up the connector
Connector is a Snowflake native app available in Snowflake Marketplace. You need ACCOUNTADMIN role to install this app. Once the app is installed, follow the instructions provided in the application. You will create a user, role, warehouse, and event table (if you don’t have one).
Important tip: In order to set up the connector, you need to have the default collation off on the account level. You can later set up the needed collation on the database/schema/table level. To make sure that the collation is off, run the following command in Snowflake:
use role ACCOUNTADMIN;
alter ACCOUNT set DEFAULT_DDL_COLLATION = '';
-- check the parameter
show parameters in account;
Set up the agent container
Once you downloaded the app for Snowflake Marketplace it is time to set up the agent container. Make sure that you have all the mentioned prerequisites for running the agent.
Let’s start with downloading MariaDB JDBC driver. You can get it here.
The next step is to configure the agent by preparing and mounting two JSON files into the container:
snowflake.json: This file is downloaded at the end of the connector setup process through the wizard in Snowsight.datasources.json: This file must be created manually and includes details about your source database configuration.
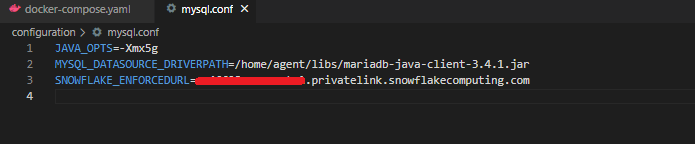
If your Snowflake account is an account with a privatelink, you should additionally specify SNOWFLAKE_ENFORCEDURL.
Let’s see how all of this should look like:
- Docker-compose.yaml: Your Docker container setup should resemble the example in the image below. To acquire the database-connector-agent image, execute the following command in your terminal:
docker pull snowflakedb/database-connector-agent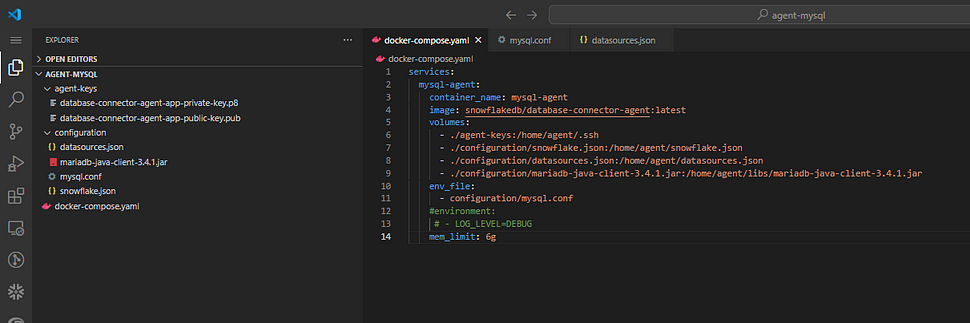
Create two folders:
1. agent-keys:
Automatically generated keys will be stored in the agent-keys folder. The snowflake.json file will initially contain a temporary private key, which will be deleted after the first run. The permanent private and public keys will then be saved in the agent-keys folder.
2. configuration:
In this folder you need to add:
- mariadb-java-client-3.4.1.jar: This is the file you have downloaded in the previous step.
- datasources.json: This is the file that you need to configure. In my example, MySQL instance is hosted as RDS in AWS. However, it can also be an local instance. Here is how it should look like:

- snowflake.json: This is the file you downloaded via wizard in Snowsight.
- mysqlconf.conf: It is recommended to have this file if you are using snowflake privatelink account. Here is how it should look like:
Once everything is set up, execute the following command in your terminal:
docker compose upThis will start the agent, which should connect successfully if all configurations are correct. If you encounter any errors, revisit the setup instructions and ensure each step was followed accurately.
Final steps
After successfully setting up the container and connecting the agent, return to the Snowsight wizard and click Refresh. You should see confirmation that the agent is fully set up and connected. At this point, it’s time to define the tables you want to transfer.
The application will generate a Snowflake worksheet with detailed instructions for the next steps, such as how to add tables and remove tables from replication, schedule replication, etc.
As a best practice, consider creating a separate database specifically for the connector’s operations, like in the example below:
-----------------------------------
-- Init session
-----------------------------------

ALTER SESSION SET AUTOCOMMIT = TRUE;
USE SCHEMA "SNOWFLAKE_CONNECTOR_FOR_MYSQL".PUBLIC;

--This is the database that where data will be replicated
CREATE OR REPLACE DATABASE CONNECTORS_DEST_DB;

GRANT CREATE SCHEMA ON DATABASE CONNECTORS_DEST_DB TO APPLICATION SNOWFLAKE_CONNECTOR_FOR_MYSQL;

-----------------------------------
-- Configuring replication
-----------------------------------
-- MYSQLDS1 is the name of the data source in datasource.json file
CALL SNOWFLAKE_CONNECTOR_FOR_MYSQL.PUBLIC.ADD_DATA_SOURCE('MYSQLDS1', 'CONNECTORS_DEST_DB');
If you got here than the hard part is done! Play around to see how connector handles DDL and DML operations. Make sure to set up replication schedule to avoid unnecessary costs. For example, you can schedule it to run every hour:
CALL SNOWFLAKE_CONNECTOR_FOR_MYSQL.PUBLIC.ENABLE_SCHEDULED_REPLICATION('MYSQLDS1', '60 MINUTE');
Consultant and Data Engineer
